|
Using Access 2003 | ||||||||||||
|
Welcome to the tutorial for using Microsoft Access to create a database. Enjoy! | ||||||||||||
|
PREREQUISITES | ||||||||||||
To be able to complete this
tutorial you will need the following:
Prior to beginning this tutorial you should be able to perform the following basic tasks on your computer:
| ||||||||||||
|
THE STEPS
|
||||||||||||
|
ADVICE BEFORE STARTING | ||||||||||||
| Before
you begin, two words of advice that cannot be stated often enough while
doing a computer project...
Word One: SAVE EARLY, SAVE OFTEN to avoid losing your database and its revisions!!! Word Two: If you do not
like the changes, 'Ctrl' and 'Z' simultaneously to undo
or...
| ||||||||||||
| Step One | ||||||||||||
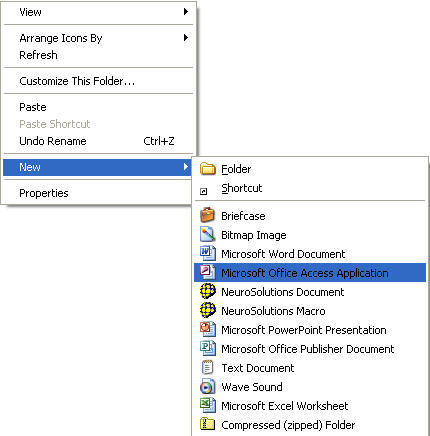
| In this step you will use the right mouse
button to create a new folder on your M: drive and you will then rename the
folder to reflect the project on which you are working.
1. Open My Computer (from the Start menu). Your M: drive will look something like the following:
Double click on the drive and when it
opens, right click anywhere on the window for the M: drive to open the
following menu 2. Go to 'New' > 'Folder' to create a new folder on the M: drive and click on it
3. Right click on the folder and rename it MyDatabase 4. Open the MyDatabase folder and right click on the resulting window. Choose New ... Microsoft Office Access Application from the menu to create a new database file. Be sure to name the database something that reflects what the data that it will contain.
| ||||||||||||
| Step Two | ||||||||||||
| In this
step you will use the 'Start' button to open Microsoft Access and open the
database file that you created in the previous step.
1. Click on the 'Start' button in the lower left of your computer screen
2. Go to 'All Programs' > 'Applications > 'Microsoft Office Access 2003' and click 3. Once Access opens, choose 'File' > 'Open ...' and navigate to the database file that you created in the previous step. When you find the file, double click on it. If you see the following message, click the 'Open' button.
4. You will then see the following window which lets you know that you are ready to begin building the database.
5. Be sure that when you make changes to
the database, you save those changes often by choosing 'File' > 'Save' or by
clicking the Save icon: | ||||||||||||
| Step Three | ||||||||||||
| In this step you will create tables in
your database using the design view. For your assignment, you will
need to create at least three tables.
1. Click on 'Create table in Design view' and the following window will appear:
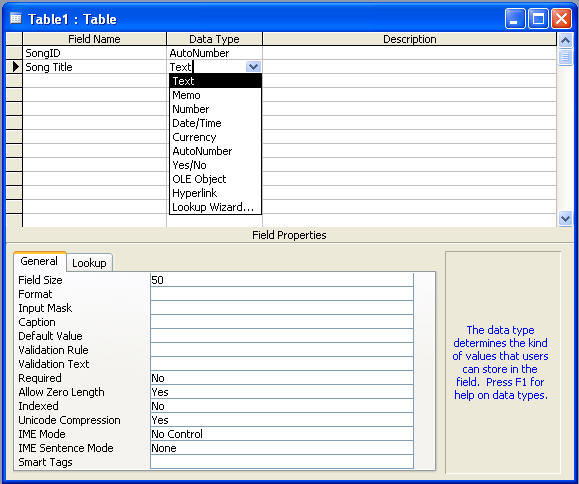
2. Begin to enter the field names for your first table. The first field you enter for a particular table will often be an Identification number that is automatically generated for each record that is entered into the table. This ID number allows tables to be easily connected to each other. In addition, for each field name that you enter, you will have to specify the type of data that will be stored in that field. For example, the window will look as follows if my first field is an automatically generated number and is called 'SongID' and my second field is called 'Song Title'. For 'Song Title', I need to choose the type of data (which in this case is 'Text'):
3. Once you choose the data type for the field, you will have to specify the General details of the field. For example, how long is the field (field size)? Is the field Required to be entered for every record? Could the field length be zero? You can use 'Help' if you want or need more details about any of these entries. 4. After you have created the ID number for your first table, right click on it and you will see the following menu. Choose 'Primary Key' so that this field can be used to easily access the data in the table.
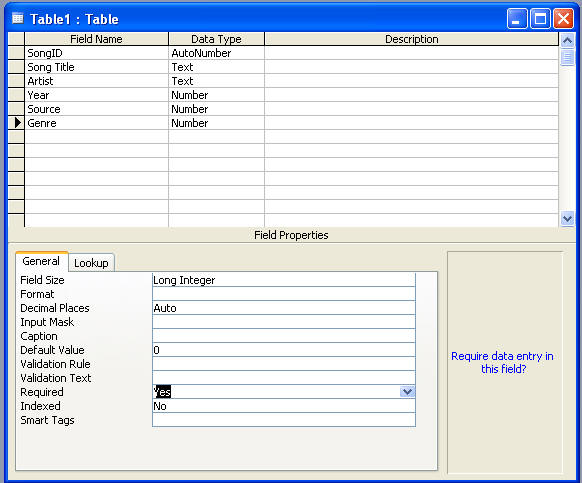
5. When I'm finished creating my first table, it looks as follows. Notice that the 'Source' and 'Genre' fields are both numbers. These numbers will correspond to the ID numbers in two other tables (a 'Download Source' table and a 'Genre' table) in my completed database.
6. Once you have created the table, you should save it by choosing 'File' > 'Save' (or clicking the Save icon). Choose a name for the table that reflects the data that will be stored in it. For example, I will save my first table as 'Songs'. My second table will be called 'Download Sources' and my third table will be called 'Genres'. | ||||||||||||
| Step Four | ||||||||||||
| In this
step, you will link the tables that you've created together.
1. After I
finished the previous step, my three tables look as follows. (Note
that each table has a primary key which is represented by
2. In the Songs table, click on the Source field and then the Lookup tab. Choose List Box from the Display Control menu as shown below:
3. Be sure that 'Row Source Type' says 'Table/Query' and 'Row Source' contains the name of the table that has the valid values for the field. For example, in the case of the Songs table, the Source field should look as follows:
4. Repeat the process
for other fields that should be linked to another table. Be sure
to save your work. | ||||||||||||
| Step Five | ||||||||||||
| In this step, you will add
data to the tables that you've created.
1. Start with one of the tables that contains data that another table is dependent upon. For example, I will start entering data in the 'DownloadSources' table. Right click on the title bar of the table for which you want to enter data. You will see the following menu:
2. Choose 'Datasheet View' and you will see something like:
3. Put the cursor in the field following the automatically generated identification number and begin entering your data. After entering some data, your table might look something like:
4. Repeat the process for the other table on which the first table depends. That is, I would now enter data in my Genres table. 5. Now begin entering data in the main table for your database. Note that you will have drop down menus for the fields that correspond to one of your other tables.
6. When I was finished entering data in my Songs table, it looked like this:
| ||||||||||||
| Step Six | ||||||||||||
| In this step, you will learn how
to create queries on your data.
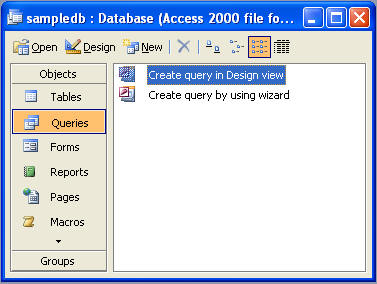
1. Choose 'Queries' from the database window:
2. The first query we will create will be a select query. In particular, we will display all songs, which are in the Songs table, whose artist is Bruce Springsteen. Choose 'Create query by using wizard' and then choose the Songs table so that you see:
3. Move the fields you want to appear in
your query from 'Available Fields' to 'Selected Fields' by choosing the
field and pressing the
4. Right click on the query title bar and choose 'Datasheet View' from the following menu to see the results of applying the query on the data.
5. Right click on the query title bar again and choose 'Query Design' from the menu so that we can change the design to show only the songs whose artist is Bruce Springsteen. When you have the design view visible again, put the cursor in the 'Criteria:' field under Artist. Choose 'Build' from the menu and the following window will appear:
6. Double click on Artist in the second
column so that it appears in the upper part of the window. Then click
on the
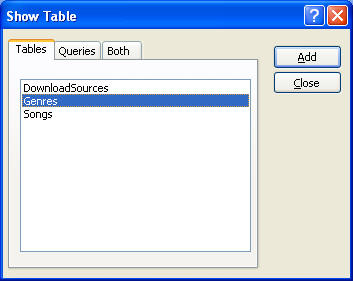
7. To see whether the query worked, choose the datasheet view again (see 4. above) and you should see only the songs whose artist is Bruce Springsteen. 8. The second query we create will be a join query. In particular, we will display songs, which are in the Songs table, with their genre name, which is in the Genres table. Recall that these two tables are related because the Songs table stores a GenreID for each of its records. Choose 'Create query in Design view'. The following window will appear and you should 'Add' all tables that will be part of your query. For example, in my query, I need the Songs table and the Genres table. 9. When you have added the appropriate tables, the following window will appear:
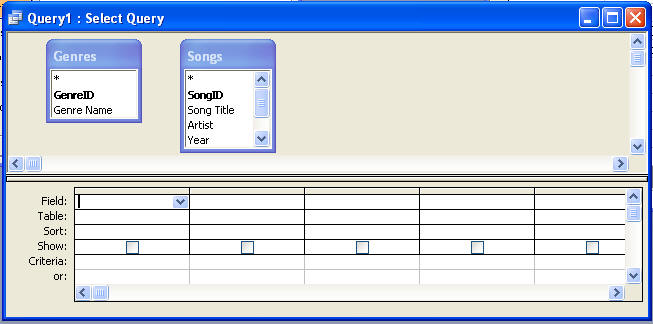
10. You can now begin to add fields to your query. I would like to display a list of all my songs along with their artists and the name of the genre to which I've assigned them. So I will choose 'Song Title' and 'Artist' from the drop down lists for the first two columns. I will then save the query (choose 'File' > 'Save') as 'Song Query'. The window will now look as follows:
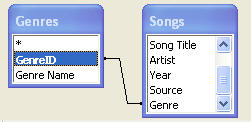
11. Notice that the title bar says that this is a Select query. But we want to create a join query. Drag the 'GenreID' field from the Genres table to the 'Genre' flag in the Songs table to create a relationship between the two fields (because they really refer to the same thing). A line will be drawn between the two fields:
12. Right click on the line between the two fields and choose 'Join Properties' to get the following window:
13. Choose number 3 (Include ALL records from 'Songs' and only those records from 'Genres' where the joined fields are equal) and press the OK button. You'll notice that the line between the two tables has changed. Now add 'Genre Name' from the Genres table to the query.
14. Switch to datasheet view (see 4. above) to see that all songs are displayed with the name of their genres rather than the number associated with the genre. |


 .) In this step, I will link
the DownloadSources table to the Source field in the Songs table and the
Genres table to the Genre field in the Songs table.
.) In this step, I will link
the DownloadSources table to the Source field in the Songs table and the
Genres table to the Genre field in the Songs table.


 button. I
chose 'Song Title', 'Artist' and 'Year' for this query and then pressed the
Next> button. On the next screen, choose 'Details' and press the Next>
button again. On the next screen, give the query a name (my query's
name is 'Springsteen Query'), choose 'Modify the Query Design' and press the
Finish button. The following window will appear:
button. I
chose 'Song Title', 'Artist' and 'Year' for this query and then pressed the
Next> button. On the next screen, choose 'Details' and press the Next>
button again. On the next screen, give the query a name (my query's
name is 'Springsteen Query'), choose 'Modify the Query Design' and press the
Finish button. The following window will appear:

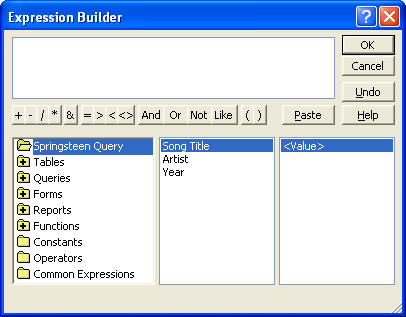
 button that an = sign appears in
the upper part of the window. Finally, type "Bruce Springsteen"
(including the quotes) next to the = sign and press the OK button. The
following window will appear:
button that an = sign appears in
the upper part of the window. Finally, type "Bruce Springsteen"
(including the quotes) next to the = sign and press the OK button. The
following window will appear: